
As I was looking for new ways to get in touch with cloud services, and to have an archive where I could dump all the information I might find useful, I stumbled upon Maris Elsins’s post on How To Build A Cost-Effective Serverless Blogging Platform On GCP
, and it caught might attention, since it combines a good amount of topics that I needed to refresh or I’ve never had the chance to put in practice in a project. I will give it a try and just hope I don’t need to change this platform in the near future.
My intention with this post is to write a summary (for my future reference too) of what Maris explains in more depth in his. Here are the ingredients for this recipe:
Recipe.

- Docker (Mandatory)
- Git (Mandatory)
- Jekyll (Mandatory)
- GCP Source Repository (Mandatory)
- GCP Container Registry (Mandatory)
- GCP Cloud Build (Mandatory)
- GCP App Engine (Mandatory)
- Custom Domain (Optional)
- Unix/Linux Host (Optional) - In my case I used a VM with CentOS7
- Jekyll Themes (Optional)
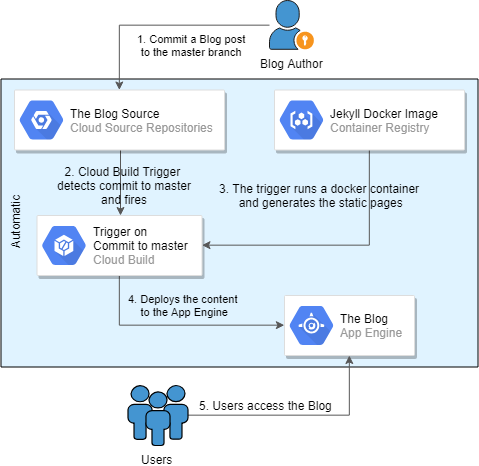
The idea behind of how this serverless blog works, is shown in the next figure extracted from Maris’s post, where you can see the workflow for the publication of a new blog post (like this one that you are reading).
Workflow for blog post publishing.
The first thing that I needed to do was to provision the host where I was going to install all the necessary tools for my blogger environment. First I tried to just move forward and deploy Docker directly on Windows 10 and it was actually a nightmare for me, so I went for the old Linux. Since I wanted to be as close to a Red Hat distro as possible, I deployed a CentOS7 minimal VM.
Docker, Git, Source Code Repository & Jekyll Installations.
For Docker installation, I just followed the steps in the documentation. But for Git it wasn’t straight forward, since the available version for CentOS7 is 1.8.3 and there has been some improvements for GCP authentication within 2.0.5. So I needed to learn something new, how to compile Git’s source code, fortunately Maris pointed to this useful post on how to do exactly that, and procedure is as follows:
- Step 1: Install Required Packages:

 # yum install curl-devel expat-devel gettext-devel openssl-devel zlib-devel
 # yum install gcc perl-ExtUtils-MakeMaker

- Step 2: Uninstall any prior installation of Git through RPM file or Yum package manager.

 # yum remove git

- Step 3: Download, extract and compile Git source.

 # cd /usr/src
 # wget https://www.kernel.org/pub/software/scm/git/git-2.0.5.tar.gz
 # tar xzf git-2.0.5.tar.gz

 # cd git-2.0.5
 # make prefix=/usr/local/git all
 # make prefix=/usr/local/git install
 # echo "export PATH=$PATH:/usr/local/git/bin" >> /etc/bashrc
 # source /etc/bashrc

- Step 4: Check successful installation of Git version 2.0.5.

# git --version
GCP Source Repository:
Now that I had Git already installed, I needed to create the repository to commit all changes that I’ll make to the blog code.
- Step 1: Login to you Google account, create a GCP project, and install Google Cloud SDK

- Step 2: Configure the SDK.

$ gcloud init

- Step 3: Create the source repository and enable the API service for the project.

$ gcloud source repos create [repository-name]

- Step 4: Clone the empty repository from GCP to the workstation.

$ cd [repository-name-localdir]
$ gcloud source repos clone [repository-name]
Jekyll:
Since the serverless blog is based on the use of Docker, I deployed the default Jekyll Docker image.
Personally, I think that understanding and working with Jekyll was the hardest part for me, since I haven’t worked with CSS, or a static web page generators before, I even changed the default theme for the blog, so I think it made it somewhat confusing.
In Maris Elsins’s blog posts, he writes the procedure with a different structure and more depth, this might be easier to follow for someone, but here, I’m just trying to compress all the steps I followed.
$ docker pull jekyll/jekyll
$ cd [repository-name-localdir]

- Start a container, obtain an interactive bash session, and create the initial blog site structure by running jekyll new.

$ docker run --rm --publish 4000:4000 --volume="$PWD:/srv/jekyll" --privileged -it jekyll/jekyll:latest bash
$ jekyll new /srv/jekyll

- You could run jekyll server to test the blog, using your VM's IP and 4000 port (e.g. http://192.168.33.13:4000/)
#I would like to point out that this would depend on your VM configuration, if the network connection is NAT, bridged, etc.

$ jekyll serve
Later, we will need to create a new Docker image as a baseline to automate the generation of our static web page from within GCP, but before doing that, we should create a script, so it’s already included in this Docker image.
To use the GCP Cloud Build, Maris found some issues using generating the web page on the default directory because of some file access privilege issues, I haven’t had the time or knowledge to see if there is a better solution to this, but for now, what Maris states as a workaround works just fine.
Here is where the script comes into play, it will simply copy all the files to some local directory (/u01) inside the container to work with them, and then will copy back the built _site folder.
bash-4.4# echo "rm -rf /u01 /srv/jekyll/_site > /dev/null
mkdir /u01
chmod 777 /srv/jekyll /u01
cp -r /srv/jekyll/* /u01/
cd /u01/
JEKYLL_ENV=production jekyll build
cp -r /u01/_site /srv/jekyll/
rm -rf /u01 > /dev/null" > /root/init_build.sh

bash-4.4# chmod a+x /root/init_build.sh
Finally, from another session, commit the changes to a Docker image while the container is running, so all the downloaded dependencies and the script, will be included.
- Get the Container ID for the running container.

$ docker ps -a

- Make a "snapshot" of the running container. Docker images pushed to the GCP Container Registry need to follow a specific naming of [HOSTNAME]/[PROJECT-ID]/[IMAGE].

$ docker container commit [CONTAINER ID] gcr.io/[PROJECT-ID]/jekyll:latest
Within the [repository-name-localdir]/, the _site directory is the generated version of the static pages, and .sass-cache is some caching mechanism that Jekyll uses. Both of these locations are excluded in .gitignore.
To make some customizations of the blog, you can edit the _config.yml to change the theme of the blog, add plugins and adjust other parameters that you could check within Jekyll minimal theme documentation.
GCP Container Registry, Cloud Build and APP Engine

Container Registry is a private container image registry that runs on Google Cloud. To make use of the registry you will need to select or create a Cloud project, make sure that billing is enabled for your Google Cloud project and enable the Container Registry API, for all this you can just follow the documentation provided by Google.
Since we have already configured de GCP SDK and Docker, we now have to configure Docker to use the gcloud command-line tool as a credential helper to authenticate the requests. This is a one line command and you are only required to do it once.
$ gcloud auth configure-docker

- Push the already committed docker image to your project Registry

$ docker push gcr.io/[PROJECT-ID]/jekyll:latest

Cloud Build is a service that executes a build to your specifications in a “cloudbuild.yaml” file, and produce artifacts such as Docker containers or Java archives on Google Cloud Platform infrastructure.
- Create the yaml file in the root of the repository
$ cat cloudbuild.yaml
steps:
  - name: 'gcr.io/cloud-builders/docker'
    args: ['run', '--rm', '--volume=/workspace:/srv/jekyll', '--privileged', 'gcr.io/[PROJECT-ID]/jekyll:latest', '/root/init_build.sh']
  - name: "gcr.io/cloud-builders/gcloud"
    args: ["app", "deploy"]
timeout: "600s"

App Engine is a fully managed serverless application platform that allows you to build, deploy and scale applications seamlessly, supports popular development languages and a wide range of developer tools.
In this case, we are using Python2.7 as Maris explains in his post, I think it won’t be a problem to use Python3.6, but being in the safe side, I would like to review in more depth the implications of using that version, price-wise and code-wise.
To use the App Engine, We need to create an “app.yaml” file to tell the App Engine how the deployment needs to be done.
$ cat app.yaml
runtime: python27
api_version: 1
threadsafe: true
handlers:
- url: /
  static_files: _site/index.html
  upload: _site/index.html
  secure: always
  redirect_http_response_code: 301
- url: /(.*)
  static_files: _site/\1
  upload: _site/(.*)
  secure: always
  redirect_http_response_code: 301
We would now have some new files available to commit and push to the GCP repository, so we should do so.
- Step 5: Commit the new files to the master and push them to the remote repository.
$ git add -A
$ git status
$ git commit -m "initial commit"
$ git push origin master
Now the Docker image is uploaded, all the files needed (cloudbuild.yaml and app.yaml) are in place and the blog is ready to be deployed using the App Engine.
When deploying an app for a project for the first time, it will ask for the region where we want the application and this cannot be changed.
$ gcloud app deploy
Choose the region where you want your App Engine application located and continue with the deployment
After the deployment is completed, you could access the app via https://[PROJECT-ID].appspot.com
Cherry on top - Putting it all together
At this point, we have just created/uploaded the different components into GCP, and ran the application for the first time in order to test it, but we have one piece left that brings everything together, and that is the Cloud Build Trigger.
This will initiate the previous cloudbuild.yaml when a commit to the master branch of the repository happens.
Before configuring the Trigger, and to avoid problems in the deployment workflow, there are a couple of things we need to have in place:
- The "App Engine Admin API" needs to be enabled by navigating to "APIs & Services". You can search for it in the Library.
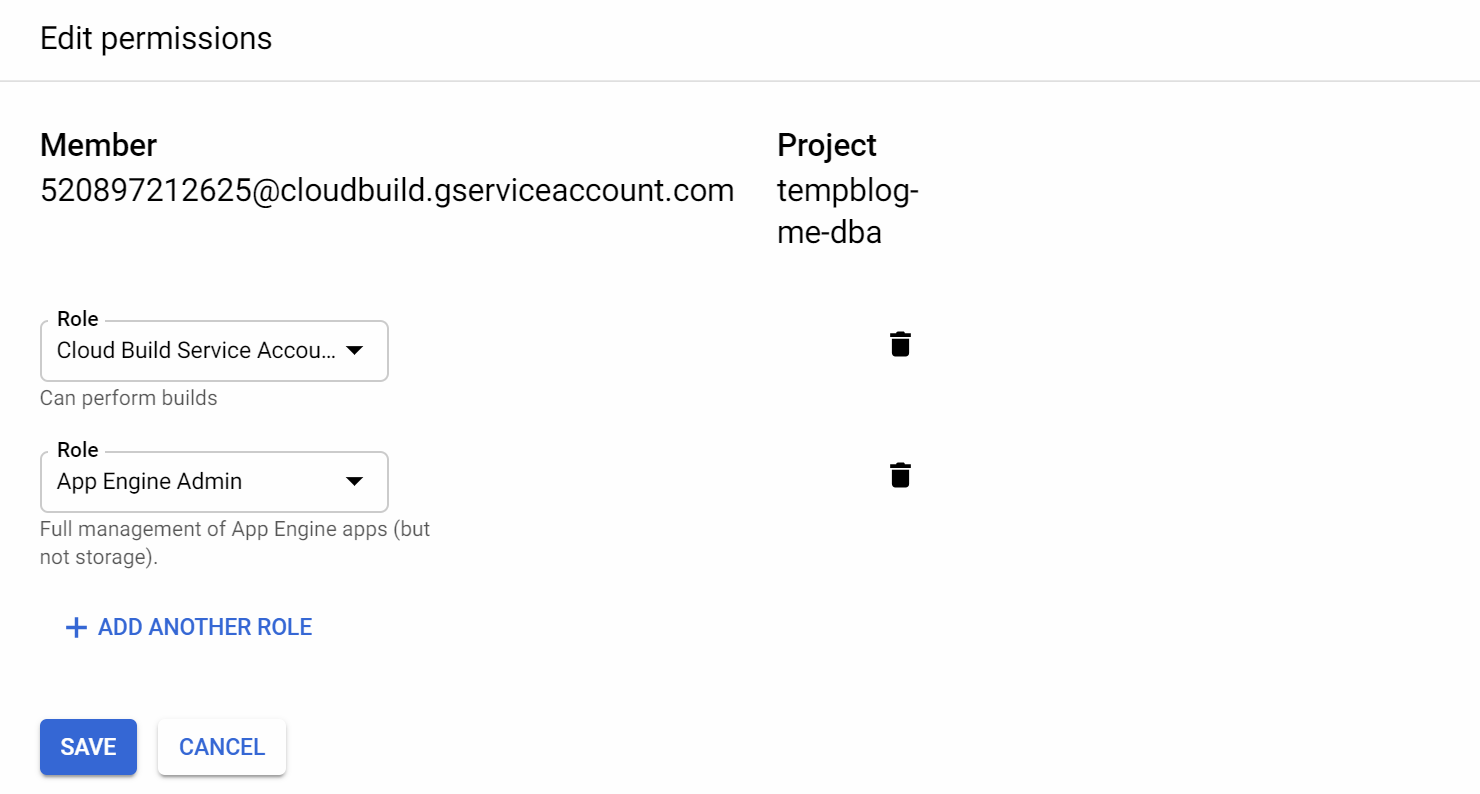
- App Engine Admin API needs to be enabled for the Service account that the Cloud Build uses, this will look like "[ID]@cloudbuild.gserviceaccount.com". In other words, Cloud Build needs to have permissions to deploy the app.
Navigate to "IAM & Admin" -> "IAM", find the service account listed, and add "App Engine Admin" role to that account as stated in the following image:
With the correct roles in place, we can now proceed and configure the Trigger. Go to “Cloud Build” -> “Triggers” in GCP Cloud Console, enable the Cloud Build API in case it’s disabled and then create a trigger.
- Select "Cloud Source Repository" option.
- Select the name of your repository.
- Provide the following options:
- Name.
- "Branch" as Trigger Type.
- Choose the yaml file as the Build Configuration.
Now the cycle is closed, after creating the trigger, every commit to the master branch will execute the build configuration file, build the new static web pages with jekyll and redeploy the app.
Additionally, I would like to apply some improvements to this deployment. If by any chance I do work in this improvements, I’ll add a link to the related posts with more information.
Next Steps:
- In Maris's post, there is the option to add the comment section using Disqus, but I'm not completely convinced of using that one in particular, so I'll be looking forward to add the comment section using other service.
- Price capping for services used in GCP to prevent any unwanted charges.
- Others not yet defined.
Additional tips:
- To change the default domain given by google, you can follow Google's documentation on custom domains mappings.
- If by any chance you lose access to your still deployed docker container, you could login back in with "docker exec -it [container] bash", and you can look for the name or ID of the target container with "docker ps".
- In my case, by the time of writing this post, I've changed several times the hardware where I deployed the initial CentOS VM, which made me redeploy my environment a couple times and clone the repository from GCP.
I don't know for sure (yet) the technical reason for this, but I encountered problems related to the privileges needed to run jekyll within docker, since it seems that even if you are "privileged" for the docker container, from the container you are not allowed to write into the directories where the container is deployed, depends if the directory was created with root user or not, I think.
As you can notice I'm not a systems expert :), but following the process without a root user (as you should), you shouldn't encounter any problems.
That’s all for this post, I’m happy to share my notes with you, I hope it is useful to you as it is for me.
If you want to give any feedback, please feel free to reach me through social media.
Photo by Jesus Kiteque on Unsplash